skip to main |
skip to sidebar
Before I bought the Mini 9, I tried to find out as much information as I could about the SSD that came with it. Most of the blogs I found said that the default SSD that Dell puts in these things is not very fast. When I called Dell to ask about the speed of the SSD, the guy I talked with told me the SSDs were, and I'm not making this up, "5400 RPM."
That pretty much settled it for me, I went with the minimum 8 GB SSD from Dell and started looking to buy an SSD online for the Mini 9. The Mini 9's use mini PCIe with a PATA interface for their SSDs, which means not that many companies make them. Most of the SSDs I found had 40/15 MB/s read/write speeds, but I found from mydigitaldiscount.com that RunCore makes SSDs for the Mini 9 that have 78/44 MB/s read/write speeds.
The RunCore drives are a little more expensive, but, in my opinion, worth it for the speed. Few people realize how much of a bottleneck your hard drive can be for tasks like launching programs or booting up. Also, it appears that mydigitaldiscount.com has trouble meeting demand with these RunCore SSDs, so be prepared to wait a bit for what I think is the best SSD on the market for the Mini 9.
Be careful when shopping for SSDs for a Mini 9. Don't get one that says it's designed for an ASUS netbook, I've read that these are too large to fit inside the Mini 9.
Things you'll need to upgrade your SSD in your Mini 9:
- Mini 9
- Mini PCIe SSD with PATA interface
- Phillips head screw driver
- External CD/DVD drive with an installation disc for your favourite operating system or an operating system installation loaded onto a bootable flash drive
Before you get started, like before, you'll want to ground yourself so you don't ruin anything with a static discharge.
Let's get started.
- Remove the back plate on your Mini 9. Refer to my Dell Inspiron Mini 9 RAM Upgrade post for instructions on removing the back plate.
- Remove the screws holding the SSD into place, it should spring up and sit at an angle.

- Carefully remove the SSD and set aside.


Notice on the RunCore SSD (on the left) the silver connector at the top, just right of center. That is a USB port; the RunCore drives can also be hooked up to a computer via USB. If only the drive Dell shipped with the Mini 9 had this feature.
- Insert your new SSD in place of the old one. Carefully, but firmly, push the drive into place.
- The drive will, again, sit at an angle. Replace the screws to hold the drive down


- Replace the back plate on your Mini 9.
Congratulations, you've successfully replaced your SSD on your mini 9! As far as doing something with your old SSD, I haven't come up with a use yet. Apparently, there is a Japanese company that makes external enclosures to turn these mini PCIe SSDs into external USB drives. My Japanese isn't the best, but I think they are kind of expensive. If anyone finds an affordable way to turn my spare SSD into an external hard drive, please let me know!
Next time, we'll tackle the operating system installation using a bootable flash drive.
When I bought my Mini 9, Dell wanted $75 to upgrade the RAM from 512 MB to 2GB. Dell also only puts in 533 MHz RAM when you order the Mini 9, but they sell replacement RAM at 800 MHz. I found on Newegg.com that I could get a 2 GB stick of RAM at 800 MHz for about $17 that would work in the Mini 9. Seemed like a no-brainer to me. NOTE: it appears the price has gone up for this particular stick of RAM.
In order to upgrade the RAM on your Mini 9, you will need:
- Dell Mini 9
- RAM - 200 pin DDR2 at 800HMz (533 MHz or 667 MHz will also work)
- Small phillips head screw driver
Before you get started, remember to ground yourself (that's no TV, no phone, and no internet...) so that you don't ruin your electronics with a static discharge. That means it's probably not a good idea to put on and take off your new sweater a bunch of times really fast or scuff around the carpet in your wool socks.
Let's get started.
- Make sure your Mini 9 is turned off and you have disconnected the power cable and removed the battery.
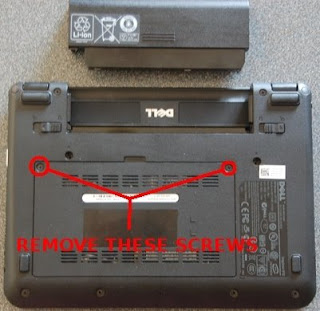
- Remove the two screws indicated above and gently pry the back plate off with the screw driver.


- Carefully use your fingers to pull the metal brackets on the sides of the RAM to the sides, the RAM should pop up at an angle.
- Pull the stick of RAM out and set aside for later.

- Put the new RAM in place. Carefully, but firmly, push it into the connector, it should remain up at an angle like the old RAM just before you removed it.
- Carefully, but firmly, press the RAM down until the side brackets click into place and the RAM stays securly down and parallel to the board.

- Replace the back place, pressing down so that it clicks into place and replace the screws.
- Replace the battery and/or plug in the power cable and boot up your Mini 9 and enjoy your new RAM.
- Get crafty with the RAM you removed from your Mini 9. Make some nice jewelry out of it, maybe a neclace or some earrings, use your imagination!
Well, we did it, and it wasn't that hard. Next time we'll prep for upgrading the SSD by making a bootable Debian installation flash drive.


