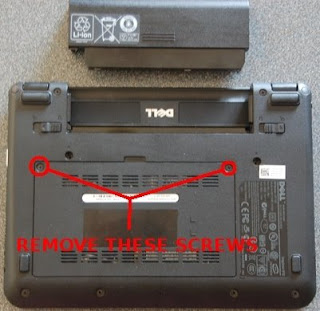
In order to upgrade the RAM on your Mini 9, you will need:
- Dell Mini 9
- RAM - 200 pin DDR2 at 800HMz (533 MHz or 667 MHz will also work)
- Small phillips head screw driver
Before you get started, remember to ground yourself (that's no TV, no phone, and no internet...) so that you don't ruin your electronics with a static discharge. That means it's probably not a good idea to put on and take off your new sweater a bunch of times really fast or scuff around the carpet in your wool socks.
Let's get started.
- Make sure your Mini 9 is turned off and you have disconnected the power cable and removed the battery.
- Remove the two screws indicated above and gently pry the back plate off with the screw driver.
- Carefully use your fingers to pull the metal brackets on the sides of the RAM to the sides, the RAM should pop up at an angle.
- Pull the stick of RAM out and set aside for later.
- Put the new RAM in place. Carefully, but firmly, push it into the connector, it should remain up at an angle like the old RAM just before you removed it.
- Carefully, but firmly, press the RAM down until the side brackets click into place and the RAM stays securly down and parallel to the board.
- Replace the back place, pressing down so that it clicks into place and replace the screws.
- Replace the battery and/or plug in the power cable and boot up your Mini 9 and enjoy your new RAM.
- Get crafty with the RAM you removed from your Mini 9. Make some nice jewelry out of it, maybe a neclace or some earrings, use your imagination!


Well, we did it, and it wasn't that hard. Next time we'll prep for upgrading the SSD by making a bootable Debian installation flash drive.
This is a great posting. Simple instructions and great visual aids. Good information about the RAM speed and pricing.
ReplyDeleteThis is something to think about when ordering a new computer. You may be better off ording the bare minimum and then upgrading it yourself.
Yes, you do want to be careful when buying a computer from a manufacturer like this. It can be a bit of work to research prices/speeds/etc. on all the parts, but you can certainly come out ahead, as I did with the RAM.
ReplyDelete